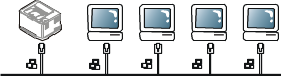
This chapter gives you step-by-step instructions for setting up the network connected machine and software.
You need to set up the network protocols on the machine to use it as your network machine. You can set up the basic network settings through the machine's control panel or network setting programs.
The following table shows the network environments supported by the machine:
|
Item |
Requirements |
|---|---|
|
Network interface |
|
|
Network operating system |
|
|
Network protocols |
See IPv6 configuration. |
|
Wireless security |
|
There are several programs available to setup the network settings easily in network environment. For the network administrator especially, managing several machines on the network is possible.
![[Note]](../common/note.png)
|
|
|
Before using the programs below, set the IP address first. |
Web server embedded on your network machine, which allows you to:
-
Configure the network parameters necessary for the machine to connect to various network environments.
-
Customize machine settings.
A web-based machine management solution for network administrators. SyncThru™ Web Admin Service provides you with an efficient way of managing network devices and lets you remotely monitor and troubleshoot network machines from any site with corporate internet access. Download this program from http://solution.samsungprinter.com.
This utility program allows you to select a network interface and manually configure the IP addresses for use with the TCP/IP protocol.
|
|
|
|
TCP/IPv6 is not supported by this program. |
You must set up the network protocols on your machine to use it on your network. This chapter will show you how this is easily accomplished.
You can use network after connecting network cable to a corresponding port on your machine.
You can print a Network Configuration Report from the machine's control panel that will show the current machine’s network settings. This will help you to set up a network and troubleshoot problems.
To print the report:
In ready mode, press and hold the  (cancel
button) for about 5 seconds. You can find your
machine’s MAC address and IP address.
(cancel
button) for about 5 seconds. You can find your
machine’s MAC address and IP address.
For example:
-
MAC Address: 00:15:99:41:A2:78
-
IP Address: 192.0.0.192
Firstly, you have to set up an IP address for network printing and managements. In most cases a new IP address will be automatically assigned by a DHCP (Dynamic Host Configuration Protocol) server located on the network.
In a few situations the IP address must be set manually. This is called a static IP and is often required in corporate Intranets for security reasons.
-
DHCP IP assignment: Connect your machine to the network, and wait a few minutes for the DHCP server to assign an IP address to the machine. Then, print the Network Configuration Report as explained above. If the report shows that the IP address has changed, the assignment was successful. You will see the new IP address in the report.
-
Static IP assignment: Use SetIP program to change the IP address from your computer.
In an office environment, we recommend that you contact a network administrator to set this address for you.
This program is for manually setting the network IP address of your machine using its MAC address to communicate with the machine. A MAC address is the hardware serial number of the network interface and can be found in the Network Configuration Report.
For using SetIP program, disable the computer firewall before continuing by performing the following:
-
Open > .
-
Double click .
-
Click .
-
Disable the firewall.
-
Insert the Printer Software CD-ROM provided with your machine. When the driver CD runs automatically, close that window.
-
Start Windows Explorer and open the X drive. (X represents your CD-ROM drive.)
-
Double-click > SetIP.
-
Double-click to install this program.
-
Select a language, then click .
-
Follow the instructions in the window and complete the installation.
-
Connect your machine to the network with a network cable.
-
Turned on the machine.
-
From the Windows menu, select > > SetIP > SetIP.
-
Click on the
 icon (third
from left) in the SetIP window
to open the TCP/IP configuration window.
icon (third
from left) in the SetIP window
to open the TCP/IP configuration window. -
Enter the machine’s new information into the configuration window as follows. In a corporate intranet, you may need to have this information assigned by a network manager before proceeding.
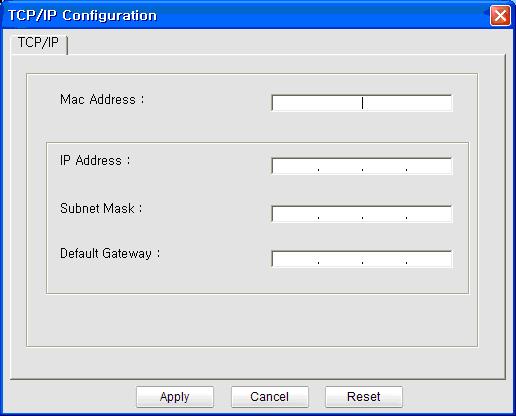
-
: Find the machine’s MAC address from the Network Configuration Report and enter it without the colons. For example, 00:15:99:29:51:A8 becomes 0015992951A8.
-
: Enter a new IP address for your printer.
For example, if your computer’s IP address is 192.168.1.150, enter 192.168.1.X. (X is number between 1 and 254 other than the computer’s address.)
-
: Enter a Subnet Mask.
-
: Enter a Default Gateway.
-
-
Click , and then click . The machine will automatically print the Network Configuration Report. Confirm that all the settings are correct.
-
Click to close the SetIP program.
-
If necessary, restart the computer’s firewall.
For using SetIP program, disable the computer firewall before continuing by performing the following:
|
|
|
|
The path and UIs may differ by Mac OS version. Refer to the Mac OS manual. |
-
Open .
-
Click .
-
Click the menu.
-
Turn firewall off.
|
|
|
|
The following instructions may vary for your model. |
-
Connect your machine to the network with a network cable.
-
Insert the Installation CD-ROM, and open the disk window, select > > > .
-
Double click the file and will automatically open, then select . The browser will open the page that shows the printer’s name and IP address information.
-
Click on the
icon (third
from left) in the SetIP window
to open the TCP/IP configuration window. -
Enter the machine’s new information into the configuration window as follows. In a corporate intranet, you may need to have this information assigned by a network manager before proceeding.
-
: Find the machine’s MAC address from the Network Configuration Report and enter it without the colons. For example, 00:15:99:29:51:A8 becomes 0015992951A8.
-
: Enter a new IP address for your printer.
For example, if your computer’s IP address is 192.168.1.150, enter 192.168.1.X. (X is number between 1 and 254 other than the computer’s address.)
-
: Enter a Subnet Mask.
-
: Enter a Default Gateway.
-
-
Select , then , and again. The printer will automatically print the configuration report. Confirm that all the settings are correct. Quit Safari. You may close and eject the installation CD-ROM. If necessary, restart the computer’s firewall. You have successfully changed the IP address, subnet mask, and gateway.
SetIP program should be automatically installed during the printer driver installation.
|
|
|
|
The path and UIs may differ by Linux OS version. Refer to the Linux OS manual to turn firewall off. |
-
Print the machine’s network configuration report to find your machine’s MAC address.
-
Open the //////.
-
Double click the file.
-
Click to open the TCP/IP configuration window.
-
Enter the network card’s MAC address, IP address, subnet mask, default gateway, and then click .
When you enter the MAC address, enter it without a colon(:).
-
The machine prints the network configuration report. Confirm all the settings are correct.
-
Close the SetIP program.
![[Caution]](../common/caution.png)
|
|
|
TCP/IPv6 is supported properly only in Windows Vista or higher. |
|
|
|
|
If the IPv6 network seems to not be working, set all the network setting to the factory defaults and try again (See Restoring factory default settings using SyncThru™ Web Service). |
To use the IPv6 network environment, follow the next procedure to use the IPv6 address.
The machine is provided with IPv6 feature on.
-
Connect your machine to the network with a network cable.
-
Turn on the machine.
-
Print a Network Configuration Report from the machine’s control panel that will check IPv6 addresses.
-
Select > > > > .
-
Click on the windows.
-
Follow the instruction on the window.
|
|
|
|
If the machine does not work in the network environment, activate IPv6. Refer to the next section followed by. |
You can print a Network Configuration Report from the machine's control panel that will show the current machine’s network settings. This will help you to set up a network and troubleshooting problems.
To print the report:
In ready mode, press and hold the (cancel
button) for about 5 seconds. You can find your
machine’s MAC address and IP address.
For example:
-
MAC Address: 00:15:99:41:A2:78
-
IP Address: 192.0.0.192
Machine supports following IPv6 addresses for network printing and managements.
-
: Self-configured local IPv6 address. (Address starts with FE80.)
-
: Automatically configured IPv6 address by a network router.
-
: IPv6 address configured by a DHCPv6 server.
-
: Manually configured IPv6 address by a user.
-
Start a web browser such as Internet Explorer that supports IPv6 addressing as a URL (See SyncThru™ Web Service).
For IPv4, enter the IPv4 address (http://xxx.xxx.xxx.xxx) in the address field and press the Enter key or click .
-
When the window opens, click .
-
Click .
-
Enable the In the section.
-
Select the and click the button, then the router prefix will automatically be entered into the address field.
Enter the rest of address. (ex: 3FFE:10:88:194::AAAA. “A” is the hexadecimal 0 through 9, A through F.)
-
Click the button.
Driver installation for network printer in IPv6 network environment is same as TCP/IPv4 (See Installing network connected machine’s driver).
Select TCP/IP Port and when the list of machines are displayed, simply select your machine's IPv6 address.
-
Start a web browser such as Internet Explorer, Safari or Firefox and enter your machine’s new IP address in the browser window.
For example,

-
Click to access the SyncThru™ Web Service.
-
Click on the upper right of the SyncThru™ Web Service website.
A log-in page appears.
-
Type in the and then click .
If it’s your first time logging into SyncThru™ Web Service, type in the below default ID and password.
-
:
-
:
-
-
When the window opens, click > > .
-
Click for network.
-
Turn off and restart machine to apply settings.
You must install the printer driver software for printing. The software includes drivers, applications, and other user friendly programs.
Make sure that the network setup for your machine is completed. All applications should be closed on your computer before beginning installation.
This is recommended for most users. All components necessary for machine operations will be installed.
Follow the steps below:
-
Make sure that the machine is connected to the network and powered on.
-
Insert the supplied software CD into your CD-ROM drive.
-
The software CD should automatically run and an installation window appear.
-
If the installation window does not appear, click and then . Type X:\, replacing “X” with the letter which represents your CD-ROM drive. Click .
-
If you use Windows Vista, Windows 7 and Windows Server 2008 R2, click > > > .
Type X:\ replacing “X” with the letter which represents your CD-ROM drive and click .
-
If the window appears in Windows Vista, Windows 7 and Windows Server 2008 R2, click in field, and click or in the window.
-
-
Select .
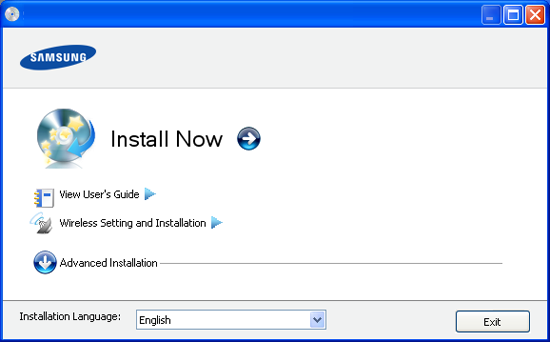
If necessary, select a language from the drop-down list.
-
For CLP-325W(K), you can access menu. The allows you to install a wireless network to connect to the machine with USB cable (See Setting a wireless network with USB cable).
-
The has two options, and . The Custom Installation allows you to select the machine’s connection and choose individual component to install. The allows you to install the supplied software such as Smart Panel. Follow the guide in the window.
-
-
Read , and select . Then, click .

The program searches the machine.
If your machine is not found in the network or locally, the following window will appear.
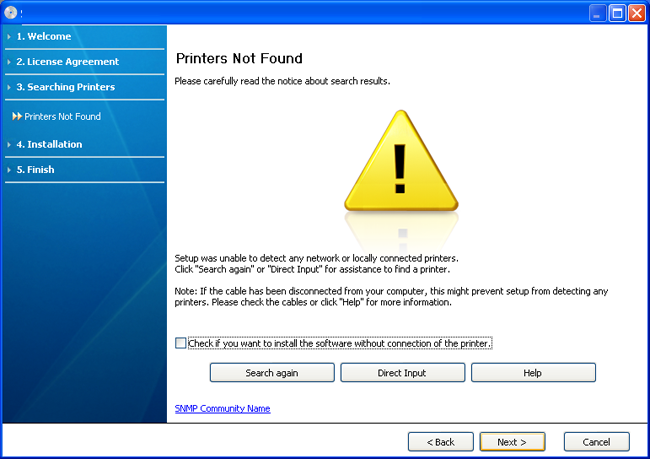
-
-
Check this option to install this program without a machine connected. In this case, the print a test page window will be skipped, and completes the installation.
-
-
When you press this button, the firewall notice window appears;
-
Turn off the firewall and . For Window operating system, click > > , and inactivate this option. For other operating system, refer to its on-line guide.
-
Turn off the firewall from the third party's program beside the operating system. Refer to the manual provided by individual programs.
-
-
The allows you to search a specific machine on the network.
-
: Enter the IP address or the host name. Then click .
To verify your machine’s IP address, print a network configuration report (See Printing a machine report).
-
: To find a shared machine (UNC Path), enter the shared name manually or find a shared printer by clicking the button. Then click .
-
-
If your machine is not connected to the computer or network, This help button gives you the detailed information about how to connect the machine.
-
-
The searched machines will be shown on the screen. Select the one you wish to use and click .
If the driver searched only one machine, the confirmation window appears.
-
After the installation is finished, a window asking you to print a test page appears. If you want to print a test page, click .
Otherwise, just click and skip to step 8.
-
If the test page prints out correctly, click .
If not, click to reprint it.
-
If you want to register your machine on Samsung website, click .
If your machine is not connected yet to the computer, click . gives detailed information about how to connect the machine. Follow the instructions in the window.
-
Click .
|
|
|
|
-
Make sure that the machine is connected to your network and powered on. Also, your machine’s IP address should have been set.
-
Insert the supplied software CD into your CD-ROM drive.
-
Double-click the CD-ROM icon that appears on your Macintosh desktop.
-
Double-click the folder.
-
Double-click the icon.
-
Enter the password and click .
-
The Samsung Installer window opens. Click .
-
Read the license agreement and click .
-
Click to agree to the license agreement.
-
Select and click . is recommended for most users. All components necessary for machine operations will be installed.
-
If you select , you can choose individual components to install.
-
-
The message which warns that all applications will close on your computer appears. Click .
-
Select the installation type you want and click .
-
: Installs default components for a device that is directly connected to user’s computer.
-
: Installs software for a device that is on the network. The SetIP program automatically runs. If the machine has already configured network information, close the SetIP program. Go to the next step.
-
: For CLP-325W(K), you can access menu. The allows you to install a wireless network to connect to the machine with USB cable (See Setting a wireless network with USB cable).
-
-
Follow the instructions on the screen to complete the installation. After the installation is finished, click or .
-
Open the folder > > .
-
For Mac OS X 10.5~10.6, open the folder > and click .
-
-
Click on the .
-
For Mac OS X 10.5~10.6, click the “” icon; a display window will pop-up.
-
-
For Mac OS X 10.3, select the tab.
-
For Mac OS X 10.4, click .
-
For Mac OS X 10.5~10.6, click .
-
-
Select in .
When printing a document containing many pages, printing performance may be enhanced by choosing for option.
-
Enter the machine’s IP address in the field.
-
Enter the queue name in the field. If you cannot determine the queue name for your machine server, try using the default queue first.
-
For Mac OS X 10.3, if Auto Select does not work properly, select in and your machine name in .
-
For Mac OS X 10.4, if Auto Select does not work properly, select in and your machine name in .
-
For Mac OS X 10.5~10.6, if Auto Select does not work properly, select and your machine name in .
Your machine appears on the , and is set as the default machine.
-
-
Click .
If the printer driver does not work properly, uninstall the driver and reinstall it.
Follow steps below to uninstall the driver for Macintosh.
-
Make sure that the machine is connected to your computer and powered on.
-
Insert the supplied software CD into your CD-ROM drive.
-
Double-click CD-ROM icon that appears on your Macintosh desktop.
-
Double-click the folder.
-
Double-click the icon.
-
Enter the password and click .
-
The Samsung Installer window opens. Click .
-
Read the license agreement and click .
-
Click to agree to the license agreement.
-
Select and click .
-
When the message which warns that all applications will close on your computer appears, Click .
-
When the uninstall is done, click .
-
You need to download Linux software packages from the Samsung website to install the printer software.
|
|
|
|
To install other software: |
-
Make sure that the machine is connected to your network and powered on. Also, your machine’s IP address should have been set.
-
From the Samsung website, download the Unified Linux Driver package to your computer.
-
Right-click the package and extract the package.
-
Double click > .
-
The Samsung Installer window opens. Click .
-
The Add printer wizard window opens. Click .
-
Select Network printer and click button.
-
The Printer’s IP address and model name appears on list field.
-
Select your machine and click .
-
Input the printer description and
-
When the add printer is done, click .
-
When the install is done, click .