This chapter explains common printing tasks.
This chapter includes:
![[Note]](../common/note.png)
|
|
|
The procedures in this chapter are mainly based on Windows XP. |
This tool helps you to screen-capture, preview, scrap and print the screen of Windows Internet Explorer more easily, when you use the ordinary program. Click > > > > to link the website where the tool is available for the download. This tool is available only for Windows operating systems.
This program helps users to adjust color as they like. You can adjust the printout color as they see them on the monitor. The adjusted color can be stored on the printer driver and applied to printouts. Click > > > > to link the website where the tool is available for the download. This tool is available only for Windows and Macintosh operating systems. (http://solution.samsungprinter.com/personal/colormanager)
Your printer drivers support the following standard features:
-
Paper orientation, size, source, and media type selection
-
Number of copies
In addition, you can use various special printing features. The following table shows a general overview of features supported by your printer drivers:
|
|
|
|
Some models or operating systems may not support some of the feature(s) in the following table. |
Your machine allows you to print from various Windows, Macintosh, or Linux applications. The exact steps for printing a document may vary depending on the application you use.
|
|
|
|
The following procedure describes the general steps required for printing from various Windows applications.
|
|
|
|
Macintosh basic printing, see Macintosh printing. Linux basic printing, see Linux printing. |
The following window is for Notepad in Windows XP. Your window may differ, depending on your operating system or the application you are using.
-
Open the document you want to print.
-
Select from the menu. The window appears.
-
Select your machine from the list.
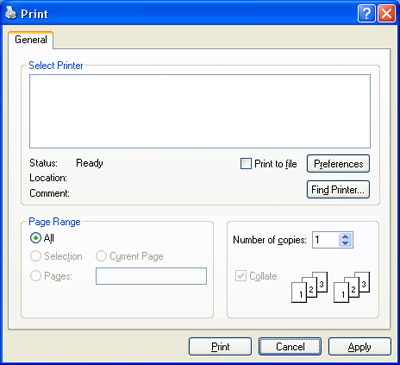
You can select the basic print settings including the number of copies and the print range from the window.
To take advantage of the printer features provided by your printer driver, click or in the application’s window to change the print setting (See Opening printing preferences).
-
To start the print job, click or in the window.
|
|
|
|
If you are using Windows Internet Explorer, the too will save your time for screen-captured images or printing the image. Click > > > to link the website where the tool is available for the download. |
If the print job is waiting in a print queue or print spooler, cancel the job as follows.
-
Click the Windows menu.
-
For Windows 2000, select > .
-
For Windows XP/Server 2003, select .
-
For Windows Server 2008/Vista, select > > .
-
For Windows 7, select > .
-
For Windows Server 2008 R2, select > > .
-
-
For Windows 2000, XP, Server 2003, Vista and Server 2008, double-click your machine.
For Windows 7 and Windows Server 2008 R2, right-click your printer icon > context menus > .
If item has a ► mark, you can select other printer drivers connected with selected printer.
-
From the menu, select .
|
|
|
|
You can also access this window by simply double-clicking
the machine icon ( You can also cancel the current job by pressing ( |

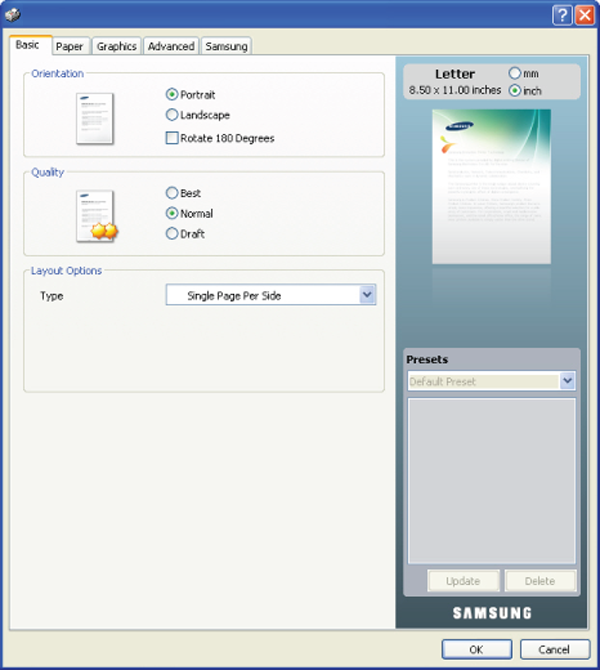
You can preview the settings you selected on the upper right of the .
-
Open the document you want to print.
-
Select from the menu. The window appears.
-
Select your machine from the .
-
Click or .
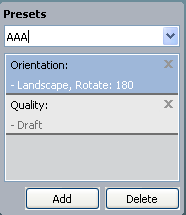
The option, which is visible on each of the preferences tab except for the tab, allows you to save the current preferences for future use.
To save a item:
-
Change the settings as needed on each tab.
-
Enter a name for the item in the input box.
-
Click . When you save , all current driver settings are saved.
If you click , the button changes to the button. Select more options and click , settings will be added to the you made.
To use a saved setting, select it from the drop-down list. The machine is now set to print according to the setting you selected.
To delete saved settings, select it from the drop-down list and click .
You can also restore the printer driver’s default settings by selecting from the drop-down list.
Click the question mark on the upper-right corner of the window and click on the topic you want to know about. Then a pop-up window appears with information about that option's feature which is provided from the driver.
If you want to search information via a keyword, click the tab in the window, and enter a keyword in the input line of the option. To get information about supplies, driver update or registration and so on, click appropriate buttons.
Special print features include:
You can select the number of pages to print on a single sheet of paper. To print more than one page per sheet, the pages will be reduced in size and arranged in the order you specify. You can print up to 16 pages on one sheet.
-
To change the print settings from your software application, access (See Opening printing preferences).
-
Click the tab, select in the drop-down list.
-
Select the number of pages you want to print per sheet (2, 4, 6, 9, or 16) in the drop-down list.
-
Select the page order from the drop-down list, if necessary.
-
Check to print a border around each page on the sheet.
-
Click the tab, select the , and .
-
Click or until you exit the window.
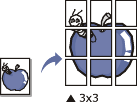
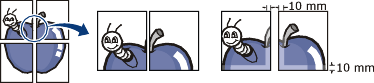
This feature allows you to print a single-page document onto 4, 9 or 16 sheets of paper, for the purpose of pasting the sheets together to form one poster-size document.
-
To change the print settings from your software application, access (See Opening printing preferences).
-
Click the tab, select in the drop-down list.
-
Select the page layout you want.
Available layouts:
-
: Document will be enlarged and be divided into 4 pages.
-
: Document will be enlarged and be divided into 9 pages.
-
: Document will be enlarged and be divided into 16 pages.
-
-
Select the value. Specify in millimeters or inches by selecting the radio button on the upper right of tab to make it easier to paste the sheets together.
-
Click the tab, select the , , and .
-
Click or until you exit the window.
-
You can complete the poster by pasting the sheets together.
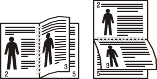
This feature prints your document on both sides of a paper and arranges the pages so that the paper can be folded in half after printing to produce a booklet.
|
|
|
|
If you want to make a booklet, you need to print on Letter, Legal, A4, US Folio or Oficio sized print media. |

-
To change the print settings from your software application, access the (See Opening printing preferences).
-
Click the tab, select from the drop-down list.
-
Click the tab, select the , , and .
The option is not available for all paper sizes. In order to find out the available paper size for this feature, select the available paper size in the option on the tab.
If you select an unavailable paper size, this option can be automatically canceled. Select only available paper. (paper without
 or
or  mark).
 -
Click or until you exit the window.
-
After printing, fold and staple the pages.
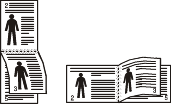
You can print on both sides of a paper (duplex). Before printing, decide how you want your document oriented. You can use this feature with Letter, Legal, A4, US Folio or Oficio sized paper (See Print media specifications).
|
|
|
|
We recommend not to print on both sides of special media, such as labels, envelopes, or thick paper. It may cause a paper jam or damage the machine. |
-
To change the print settings from your software application, access (See Opening printing preferences).
-
Click the tab.
-
From the section, select the binding option you want.
-
-
: This option is the conventional layout used in bookbinding.
-
: This option is the conventional layout used in calendars.
-
-
Click the tab, select the , , and .
-
Click or until you exit the window.
|
|
|
|
If your machine does not have a duplex unit, you should complete the printing job manually. The machine prints every other page of the document first. After that, a message appears on your computer. Follow the on-screen instructions to complete the printing job. |
You can change the size of a document to appear larger or smaller on the printed page by typing in a percentage you want.
-
To change the print settings from your software application, access (See Opening printing preferences).
-
Click the tab.
-
Enter the scaling rate in the input box.
You can also click the up/down arrows to select the scaling rate.
-
Select the , , and in .
-
Click or until you exit the window.
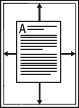
This feature allows you to scale your print job to any selected paper size regardless of the document size. This can be useful when you want to check fine details on a small document.
-
To change the print settings from your software application, access (See Opening printing preferences).
-
Click the tab.
-
Select the paper size you want from the .
-
Select the , and in .
-
Click or until you exit the window.
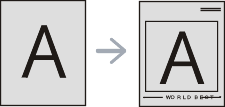
The watermark option allows you to print text over an existing document. For example, you use it when you want to have large gray letters reading “DRAFT” or “CONFIDENTIAL” printed diagonally across the first page or all pages of a document.

There are several predefined watermarks that come with the machine. They can be modified, or you can add new ones to the list.
-
To change the print settings from your software application, access (See Opening printing preferences).
-
Click the tab, and select the desired watermark from the drop-down list. You will see the selected watermark in the preview image.
-
Click or until you exit the print window.
-
To change the print settings from your software application, access (See Opening printing preferences).
-
From the tab, select from the drop-down list. The window appears.
-
Enter a text message in the box. You can enter up to 256 characters. The message displays in the preview window.
When the box is checked, the watermark prints on the first page only.
-
Select watermark options.
You can select the font name, style, size, and shade from the section, as well as set the angle of the watermark from the section.
-
Click to add a new watermark to the list.
-
When you have finished, click or until you exit the window.
To stop printing the watermark, select from the drop-down list.
-
To change the print settings from your software application, access (See Opening printing preferences).
-
Click the tab, select from the drop-down list. The window appears.
-
Select the watermark you want to edit from the list and change the watermark message and options.
-
Click to save the changes.
-
Click or until you exit the window.
-
To change the print settings from your software application, access (See Opening printing preferences).
-
Click the tab, select from the drop-down list. The window appears.
-
Select the watermark you want to delete from the list and click .
-
Click or until you exit the window.
An overlay is content you store on your hard disk drive that can be superimposed over any document you print. An overlay is often used to take the place of letterhead paper. Rather than using preprinted letterhead, you can create an overlay containing exactly the same information that is currently on your letterhead. To print a letter with your company’s letterhead, you do not need to load preprinted letterhead paper in the machine, instead you can just print the letterhead overlay on your document.
To use a page overlay, you must create a new page overlay file containing your content.
-
Create or open a document containing the content you want to use in a new page overlay. Position the items exactly where you want them to appear when they are added to the original.
-
To save the document as an overlay, access (See Opening printing preferences).
-
Click the tab, and select from the drop-down list. The window appears.
-
In the window, click .
-
In the window, type a name of up to eight characters in the box. Select the destination path, if necessary. (The default is C:\Form Over.)
-
Click . The name appears on the .
-
Click or until you exit the window.
-
The file is not printed. Instead, it is stored on your computer hard disk drive.
|
|
|
|
The overlay document size must match same as the document you print. Do not create an overlay with a watermark. |
After an overlay has been created, it is ready to be printed with your document. To print an overlay with a document:
-
Create or open the document you want to print.
-
To change the print settings from your software application, access (See Opening printing preferences).
-
Click the tab.
-
Select the desired overlay from the drop-down list.
-
If the overlay file you want does not appear in the drop-down list, select from the list and click . Select the overlay file you want to use.
If you have stored the overlay file you want to use in an external source, you can also load the file when you access the window.
After you select the file, click . The file appears in the box and is available for printing. Select the overlay from the box.
-
If necessary, check box. If this box is checked, a message window appears each time you submit a document for printing, asking you to confirm that you wish to print an overlay on your document.
If this box is not checked and an overlay has been selected, the overlay automatically prints with your document.
-
Click or until you exit the window.
The selected overlay prints over your document.
|
|
|
|
The resolution of the overlay document must match the resolution of the original print job. |
Use the following Graphics options to adjust the print quality for your specific printing needs.
|
|
|
|
If you feel the color difference between the printout and monitor, you may change the color setting such as color contrast or color level.
The printer driver provides graphic options to adjust the print quality for specific printing needs.
-
To change the print settings from your software application, access (See Opening printing preferences).
-
Click the tab. Refer to the online help for each option’s information provided from the .
-
: You can choose color options between or . Setting to typically produces the best possible print quality for color document. If you want to print a color document in gray scale, select .
allows you to print in high quality black. If you use this option, it might take longer to print.
To adjust color manually, select in . Simply slide the color balance slider in the tab to adjust color, or select tab for driver provided color correction for general image processing.
-
: You can set advanced settings by clicking the button. (PCL driver only)
-
: Select to print text darker than on a normal document. Use to prints solid black, regardless of the color it appears on the screen.
-
: This option determines the compression level of images for transferring data from computer to a printer. If you set this option to , the printing speed will be high, but the printing quality will be low. (PCL driver only)
-
: It allows you to emphasize edges of texts and fine lines for improving readability and align each color channel registration in color printing mode.
-
: It allows users to preserve the details of nature photos, and improve contrast and readability among gray scaled colors, when printing color documents in grayscale. (PCL driver only)
-
: It allows you to emphasize edges of texts and fine lines for improving readability.
-
-
: Adjusting this option extends the life of your toner cartridges and reduces your cost per page without a significant reduction in print quality.
-
You can move the slider from to to reduce toner consumption.
-
-
-
Click or until you exit the window.
This option affect the resolution and clarity of your color output. The three screen options are , and .
-
To change the print settings from your software application, access (See Opening printing preferences).
-
Click the tab then select in .
-
Select the tab.
-
Select necessary options in the .
-
: Follows the set value of mode from the printer.
-
: This mode will generate printouts with smooth tone over the entire page.
-
: This mode will generate printouts with sharp texts and smooth graphic/photo objects in the page.
-
: This mode will generate printouts with sharp details over the entire page.
-
-
Select .
|
|
|
|
Most Windows applications will override settings you specify in the printer driver. Change all print settings available in the software application first, and change any remaining settings using the printer driver. |
-
Click the Windows menu.
-
For Windows 2000, select > .
-
For Windows XP/Server 2003, select .
-
For Windows Server 2008/Vista, select > > .
-
For Windows 7, select > .
-
For Windows Server 2008 R2, select > > .
-
-
Right-click your machine.
-
For Windows XP/Server 2003/Server 2008/Vista, press .
For Windows 7 or Windows Server 2008 R2, from context menus, select the .
If item has a ► mark, you can select other printer drivers connected with the selected printer.
-
Change the settings on each tab.
-
Click .
|
|
|
|
If you want to change the settings for each print job, change it in . |
-
Click the Windows menu.
-
For Windows 2000, select > .
-
For Windows XP/Server 2003, select .
-
For Windows Server 2008/Vista, select > > .
-
For Windows 7, select > .
-
For Windows Server 2008 R2, select > > .
-
-
Select your machine.
-
Right-click your machine and select .
For Windows 7 or Windows Server 2008 R2, if item has a ► mark, you can select other printer drivers connected with the selected printer.
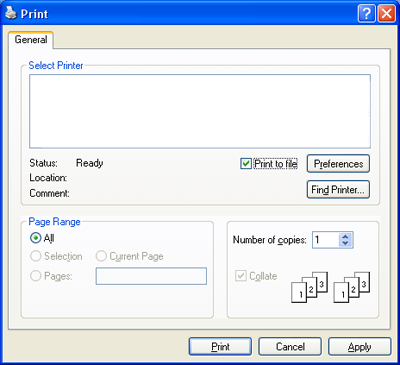
You will sometimes need to save the print data as a file. You can print the document to a file instead of routing it directly to a printer. The document is saved with the printer formating, such as font selection and color specifications, in a .prn file that can be printed on another printer.
To save a print job as a file:
-
Check the box at the window.
-
Click .
-
Type in the destination path and the file name, and then click .
For example c:\Temp\file name.
If you type in only the file name, the file is automatically saved in or . The saved folder may differ, depending on your operating system or the application you are using.
This section explains how to print using a Macintosh. You need to set the print environment before printing.
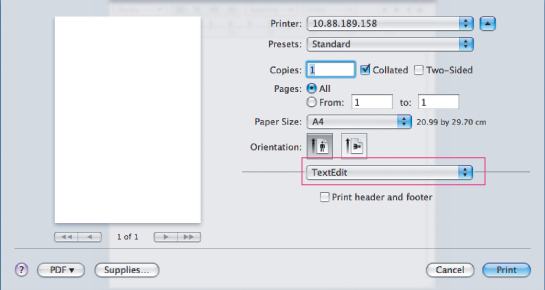
When you print with a Macintosh, you need to check the printer driver setting in each application you use. Follow the steps below to print from a Macintosh:
-
Open an application and select the file you want to print.
-
Open the menu and click ( in some applications).
-
Choose your paper size, orientation, scaling, other options, and make sure that your machine is selected. Click .

-
Open the menu and click .
-
Choose the number of copies you want and indicate which pages you want to print.
-
Click .
You can use advanced printing features when using your machine.
Open an application and select from the menu. The machine name, which appears in the printer properties window may differ depending on the machine in use. Except for the name, the composition of the printer properties window is similar to the following.
|
|
|
|
The dialog provides options to adjust how the document appears on the printed page. You can print multiple pages on one sheet of paper. Select from the drop-down list under to access the following features.
-
: This option determines how many pages to be printed on one page (See Printing multiple pages on one sheet of paper).
-
: This option allows you to select the printing direction on a page similar to the examples on UI.
-
: This option allows you to print a border around each page on the sheet.
-
: This option allows you to rotate paper 180 degrees.
The dialog provides options for selecting and . Select from the drop-down list under to access the graphic features.
-
: This option allows you to select the printing resolution. The higher the setting, the sharper the clarity of printed characters and graphics. A higher setting will also increase the time it takes to print a document.
-
: You can set the color options. Setting to typically produces the best possible print quality for color documents. If you want to print a color document in grayscale, select .
Set to correspond to the paper loaded in the tray from which you want to print. This will let you get the best quality printout. If you load a different type of print material, select the corresponding paper type.
You can print more than one page on a single sheet of paper. This feature provides a cost-effective way to print draft pages.
-
Open an application, and select from the menu.
-
Select from the drop-down list under . In the drop-down list, select the number of pages you want to print on one sheet of paper.

-
Select the other options you want to use.
-
Click , then the machine prints the selected the number of pages you want to print on one sheet of paper.
There are several Linux applications that allow you to print using the Common UNIX Printing System (CUPS). You can print using any of these applications.
-
Open an application, and select from the menu.
-
Select directly using LPR.
-
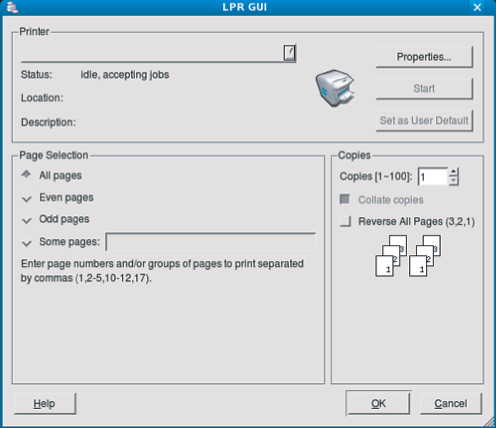
From the LPR GUI window, select the model name of your machine from the printer list and click .
-
Change the print job properties using the following four tabs displayed at the top of the window.

-
: This option allows you to change the paper size, the paper type, and the orientation of the documents. It enables the duplex feature, adds start and end banners, and changes the number of pages per sheet.
-
: This option allows you to specify the page margins and set the text options such as spacing or columns.
-
: This option allows you to set image options that are used when printing images/files such as color options, image size or image position.
-
: This option allows you to set the print resolution, paper source and special print features.
If an option is grayed out, it means that the grayed out option is not supported by your machine.
-
-
Click to apply the changes and close the window.
-
Click in the window to start printing.
-
The Printing window appears, allowing you to monitor the status of your print job.
To abort the current job, click .
You can print many different types of files on your machine using the standard CUPS way, directly from the command line interface. The CUPS LPR utility allows you to do that. But the drivers package replaces the standard LPR tool by a much more user-friendly LPR GUI program.
To print any document file:
-
Type lpr <file_name> from the Linux shell command line and press Enter. The window appears.
When you type only lpr and press , the window appears first. Just select any files you want to print and click .
-
From the window, select your machine from the list, and change the print job properties.
-
Click to start printing.
Using the window provided by the , you can change the various properties for your printer.
-
Open the .
If necessary, switch to .
-
Select your machine from the available printers list and click .
-
The window opens.
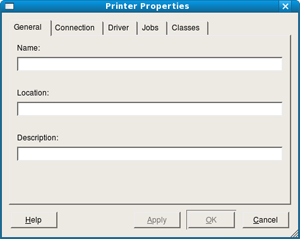
The following five tabs display at the top of the window:
-
: This option allows you to change the printer location and name. The name entered in this tab displays on the printer list in .
-
: This option allows you to view or select another port. If you change the machine port from USB to parallel or vice versa while in use, you must re-configure the machine port in this tab.
-
: Allows you to view or select another printer driver. By clicking , you can set the default device options.
-
: This option shows the list of print jobs. Click to cancel the selected job and select the check box to see previous jobs on the job list.
-
: This option shows the class that your machine is in. Click to add your machine to a specific class or click to remove the machine from the selected class.
-
-
Click to apply the changes and close the window.