This chapter gives you an overview of your machine.
This chapter includes:
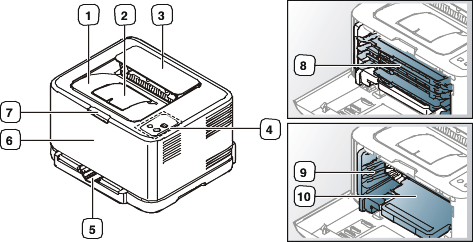
This illustration may differ from your machine depending on its model.
|
1 |
Output tray (face down) |
6 |
Front cover |
|
2 |
Output support |
7 |
Front cover release button |
|
3 |
Top cover |
8 |
Toner cartridges |
|
4 |
Control panel |
9 |
Waster toner container |
|
5 |
Tray |
10 |
Imaging unit |
This illustration may differ from your machine depending on its model.
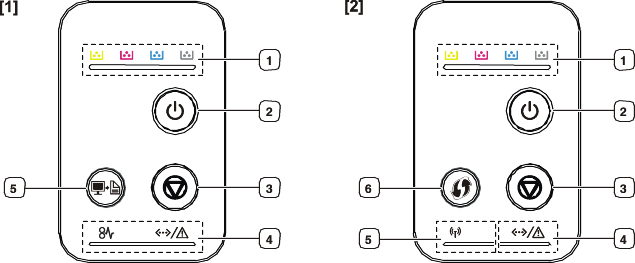
[1] CLP-320(K)/CLP-321/CLP-325(K)/ CLP-326/CLP-320N(K)/CLP-321N
|
1 |
Toner LEDs |
Shows the status of each toner cartridge (See Status/ Toner LEDs). |
|
2 |
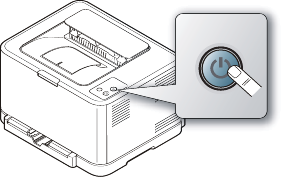
Power button |
You can turn the power on and off with this button (See Power button). |
|
3 |
Cancel button |
Stops an operation at any time and there are more functions (See Cancel button). |
|
4 |
Status LED |
Shows the status of your machine (See Status/ Toner LEDs). |
|
5 |
Print Screen [a] |
Prints the displayed screen of your monitor (See Print screen button). |
|
Demo Print [b] |
Prints a demo page (See Demo print button). |
|
|
[a] CLP-320(K)/CLP-321/CLP-325(K)/ CLP-326 only. [b] CLP-320N(K)/CLP-321N only. |
||
[2] CLP-325W(K)
|
1 |
Toner LEDs |
Shows the status of each toner cartridge (See Status/ Toner LEDs). |
|
2 |
Power button |
You can turn the power on and off with this button (See Power button). |
|
3 |
Cancel button |
Stops an operation at any time and there are more functions (See Cancel button). |
|
4 |
Status LED |
Shows the status of your machine (See Status/ Toner LEDs). |
|
5 |
Wireless LED |
Shows the status of wireless network. When the LED on, the machine is connected wirelessly (See Wireless LED). |
|
6 |
WPS button |
If your wireless access point supports WPS (Wi-Fi Protected Setup™), you can configure the wireless network connection easily without a computer (See Setting a wireless network with the WPS button). |
The color of the LEDs indicates the machine's current status.
|
LED |
Status |
Toner LEDs |
Description |
|---|---|---|---|
|
Online/Error ( |
Off |
All LEDs off |
The machine is off-line. |
|
Solid green |
All LEDs off |
The machine is online and can receive data from a computer. |
|
|
Slowly blinking green |
All LEDs off |
When the Status LED blinks green slowly, the machine is receiving data from a computer. |
|
|
Quickly blinking green |
All LEDs off |
When the Status LED blinks green quickly, the machine is printing data. |
|
|
Solid green |
Corresponding LED blinks red |
Each toner cartridge is near the end of its life. |
|
|
Corresponding LED blinks red successively |
The machine is warming up. |
||
|
Solid red |
All LEDs off |
|
|
|
Corresponding LED is solid red |
|
||
|
Blinks red |
Corresponding LED is solid red |
|
|
|
Jam ( |
Lights orange |
All LEDs off |
A paper jam has occurred (See Clearing paper jams). |
|
[a] Estimated cartridge life means the expected or estimated toner cartridge life, which indicates the average capacity of print-outs and is designed pursuant to ISO/IEC 19798. The number of pages may be affected by operating environment, printing interval, graphics, media type and media size. Some amount of toner may remain in the cartridge even when red LED is on and the printer stops printing. |
|||


![[Warning]](../common/warning.png)
|
|
|
Samsung does not recommend using non-genuine Samsung toner cartridge such as one that is refilled or remanufactured. Samsung cannot guarantee a non-genuine Samsung toner cartridge's quality. Service or repair required as a result of using non-genuine Samsung toner cartridges will not be covered under the machine warranty. |
![[Note]](../common/note.png)
|
|
|
All printing errors will be appear in the Smart Panel program window. If the problem persists, call for service (See Using the Smart Panel program). |
|
Wireless LED status |
Description |
|
|---|---|---|
|
Blue |
Off ( |
Wireless network is disconnected. |
|
On ( |
Wireless network is connected. |
|
|
Slowly blinks ( |
The machine starts connecting to a wireless network. |
|
|
Quickly blinks ( |
|
|
 (CLP-320(K)/CLP-321/CLP-325(K)/ CLP-326 only)
By pressing the () button, you
can do the following functions.
|
Function |
Description |
|---|---|
|
Printing the active window |
Press this button and the green LED will start blinking. When the green LED stops blinking, release the button. |
|
Printing the whole monitor screen |
Press this button and the green LED will start blinking. Release the button while it’s blinking. |
|
|
|
|
 (CLP-320N(K)/CLP-321N only)
It prints a demo page by pressing this button only. The printed page shows the color print quality potential and overall print characteristics of the machine.

By pressing the ( ) button, you
can do the following functions.
) button, you
can do the following functions.
|
Function |
Description |
|---|---|
|
Printing demo page (CLP-325W(K) only) |
In ready mode, press and hold this button for about 2 seconds until the status LED blinks slowly, and release (See Printing a demo page). |
|
Printing configuration sheets |
In ready mode, press and hold this button for about 5 seconds until the status LED blinks quickly, and release (See Printing a machine report). |
|
Canceling print job |
Press ( |
 (CLP-325W(K) only)
This feature automatically detects which WPS (Wi-Fi Protected Setup™) mode your access point uses. By pushing a button on the wireless LAN router / access point and the machine, you can setup the wireless network and security settings (See Setting a wireless network with the WPS button).