This chapter gives helpful information for what to do if you encounter an error.
This chapter includes:
It is possible that colored images may be printed with incorrect colors due to flawed mixing of toner colors when one of the colored toner cartridges is low on toner. You can temporarily improve print quality by redistributing the toner.
![[Note]](../common/note.png)
|
|
|
The Smart Panel program window appears on the computer telling you which cartridge is low on toner (See Using the Smart Panel program). |
-
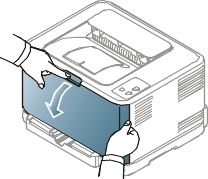
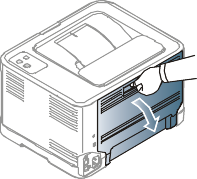
Press the release button, completely open the front cover.
-
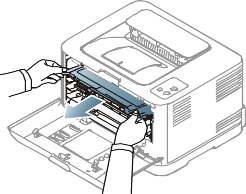
Grasp the handle on the toner cartridge and pull to remove the cartridge from the machine.
-
Holding both handles on the toner cartridge, thoroughly rock it from side to side to evenly distribute the toner.
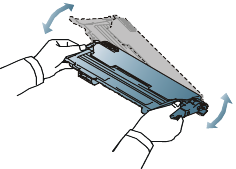
If toner gets on your clothing, wipe it off with a dry cloth and wash it in cold water. Hot water sets toner into fabric.
-
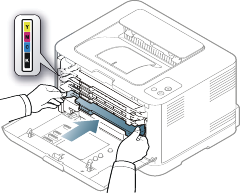
Slide the toner cartridge back into the machine.
-
Close the front cover. Make sure the cover is securely latched.
![[Warning]](../common/warning.png)
If the front cover is not completely closed, the machine will not operate.
By selecting the correct media types, most paper jams can be avoided. When a paper jam occurs, refer to the guidelines below (See Clearing paper jams.
-
Follow the procedures on Changing the tray size. Ensure that the adjustable guides are positioned correctly.
-
Do not overload the tray. Ensure that the paper level is below the paper capacity mark on the inside of the tray.
-
Do not remove paper from the tray while your machine is printing.
-
Flex, fan, and straighten paper before loading.
-
Do not use creased, damp, or highly curled paper.
-
Do not mix paper types in a tray.
-
Use only recommended print media (Setting the paper size and type).
-
Ensure that the recommended side of the print media is facing up in the tray.
![[Caution]](../common/caution.png)
|
|
|
To avoid tearing the paper, pull the jammed paper out slowly and carefully. Follow the instructions in the following sections to clear the jam. |
If a paper jam occurs, the status LED on the control panel lights orange. Find and remove the jammed paper.
If paper is jammed in the paper feed area, follow the next steps to release the jammed paper.
-
Open and close the front cover. The jammed paper is automatically ejected from the machine. If the paper does not eject, go to the next step.
-
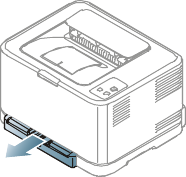
Pull out the tray.
-
Remove the jammed paper by gently pulling it straight out.
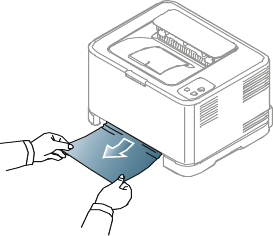
If the paper does not eject when you pull, or if you do not see the paper in this area, check the fuser area around the toner cartridge (See Inside the machine).
-
Insert the tray back into the machine until it snaps into place. Printing automatically resumes.
|
|
|
|
The fuser area is hot. Be careful when removing paper form this area to prevent getting your fingers burnt. |
-
Open and close the front cover. The jammed paper is automatically ejected from the machine. If the paper does not eject, go to the next step.
-
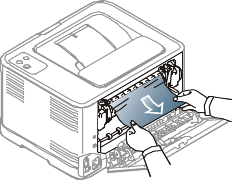
To remove the jammed paper, open the rear cover.

-
Carefully remove the jammed paper by pulling in the direction as shown below. Most of the jammed paper can be removed in this step.
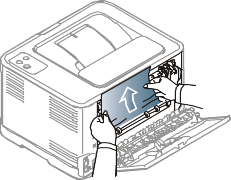
Do not touch the fuser inside the inner cover. It is hot and could cause burns. Be careful when removing paper from this area to prevent getting your fingers burnt.
If the paper does not eject when you pull, or if you do not see the paper in this area, check the paper exit area (See In the paper exit area).
-
Close the rear cover. Make sure that it is securely closed. Printing automatically resumes.
|
|
|
|
The fuser area is hot. Be careful when removing paper form this area to prevent getting your fingers burnt. |
-
Gently pull the paper out the output tray.
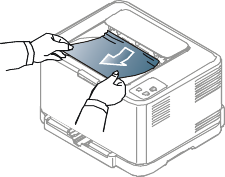
If you do not see the jammed paper or if there is any resistance when you pull, stop and go to the next step.
-
To remove the jammed paper, open the rear cover.
-
Carefully remove the paper by pulling in the direction as shown below. Most of the jammed paper can be removed in this step.
If you cannot find the jammed paper, of if there is any resistance removing the paper, go to the next step.
If the paper tears, make sure that all of the paper fragments are removed from the machine.
-
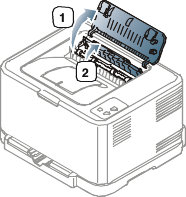
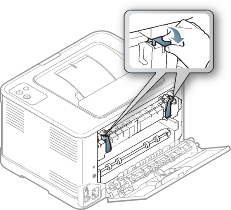
Push the fuser levers upwards.

The fuser area is hot. Take care when removing paper form the machine.
-
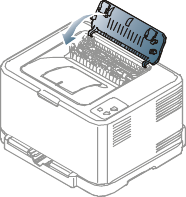
Open the top cover and inner cover.
-
Holding the inner cover open, carefully take the jammed paper out the machine. The inner cover will then close automatically.
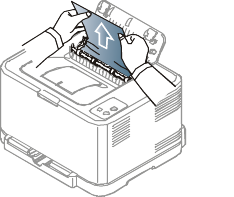
Do not touch the fuser inside the inner cover. It is hot and could cause burns. Be careful when removing paper from this area to prevent getting your fingers burnt.
-
Close the top cover. Make sure that it is securely closed.
-
Push the fuser levers downwards.
-
Open and then close the rear cover or front cover to resume printing.
The following chart lists some trouble conditions that may occur and the recommended solutions. Follow the suggested solutions until the problem is corrected. If the problem persists, contact a service representative.
Other problems include:
-
See System problems.
-
See Power problems.
-
See Printing problems.
|
Condition |
Suggested solutions |
|||
|---|---|---|---|---|
|
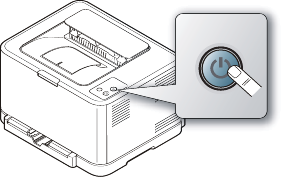
The red error light is on. |
Turn the machine on/off. If the problem persists, contact a service representative (See Contact SAMSUNG worldwide”).
|
|
Condition |
Suggested solutions |
|---|---|
|
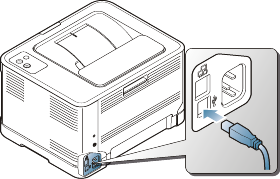
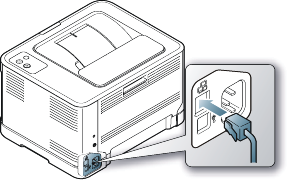
The machine is not receiving power, or the connection cable between the computer and the machine is not connected properly. |
|

|
Condition |
Suggested solutions |
|---|---|
|
Paper jams during printing. |
Clear the paper jam (See Clearing paper jams). |
|
Paper sticks together. |
|
|
Multiple sheets of paper do not feed. |
Different types of paper may be stacked in the tray. Load paper of only one type, size and weight. |
|
Paper does not feed into the machine. |
|
|
The paper keeps jamming. |
|
|
Transparencies stick together in the paper exit. |
Use only transparencies specifically designed for laser printers. Remove each transparency as it exits from the machine. |
|
Envelopes skew or fail to feed correctly. |
Ensure that the paper guides are against both sides of the envelopes. |
|
Condition |
Possible cause |
Suggested solutions |
|||
|---|---|---|---|---|---|
|
The machine does not print. |
The machine is not receiving power. |
Check the power cord connections. |
|||
|
The machine is not selected as the default machine. |
Select your machine as your default machine in your Windows. |
||||
|
Check the machine for the following:
If a system error occurs, contact a service representative. |
|||||
|
The connection cable between the computer and the machine is not connected properly. |
Disconnect the machine cable and reconnect it. |
||||
|
The connection cable between the computer and the machine is defective. |
If possible, attach the cable to another computer that is working properly and print a job. You can also try using a different machine cable. |
||||
|
The port setting is incorrect. |
Check the Windows printer setting to make sure that the print job is sent to the correct port. If the computer has more than one port, make sure that the machine is attached to the correct one. |
||||
|
The machine may be configured incorrectly. |
Check the to ensure that all of the print settings are correct (See Opening printing preferences). |
||||
|
The printer driver may be incorrectly installed. |
Repair the machine software (See Installing USB connected machine’s driver, Installing network connected machine’s driver). |
||||
|
The machine is malfunctioning. |
|
||||
|
The document size is so big that the hard disk space of the computer is insufficient to access the print job. |
Allocate more hard disk space on your computer for spooling, and try printing. |
||||
|
The output tray is full. |
It can hold up to 80 (80 g/m2) sheets of plain paper. Once the paper is removed from the output tray, the machine resumes printing. |
||||
|
If the machine is used for a long time continuously, the printing speed could be slowed down, or the machine could pause to cool down. |
Wait for the machine to cool down. Printing automatically resumes after the machine is cooled down. |
||||
|
The machine selects print materials from the wrong paper source. |
The paper option that was selected in the may be incorrect. |
For many software applications, the paper source selection is found under the Paper tab within the . Select the correct paper source. (See Opening printing preferences). |
|||
|
A print job is extremely slow. |
The job may be very complex. |
Reduce the complexity of the page or try adjusting the print quality settings. |
|||
|
Half the page is blank. |
The page orientation setting may be incorrect. |
Change the page orientation in your application. See the printer driver help screen. |
|||
|
The paper size and the paper size settings do not match. |
Ensure that the paper size in the printer driver settings matches the paper in the tray.Or, ensure that the paper size in the printer driver settings matches the paper selection in the software application settings you use. |
||||
|
The machine prints, but the text is wrong, garbled, or incomplete. |
The machine cable is loose or defective. |
Disconnect the machine cable and reconnect. Try a print job that you have already printed successfully. If possible, attach the cable and the machine to another computer that you know works and try a print job. Finally, try a new machine cable. |
|||
|
The wrong printer driver was selected. |
Check the application’s printer selection menu to ensure that your machine is selected. |
||||
|
The software application is malfunctioning. |
Try printing a job from another application. |
||||
|
The operating system is malfunctioning. |
Exit Windows and reboot the computer. Turn the machine off and back on again. |
||||
|
If you are in a DOS environment, the font setting for your machine may be set incorrectly. |
See Changing font setting (CLP-320N(K)/CLP-321N/CLP-325W(K) only). |
||||
|
Pages print, but they are blank. |
The toner cartridge is defective or out of toner. |
Redistribute the toner, if necessary.If necessary, replace the toner cartridge. |
|||
|
The file may have blank pages. |
Check the file to ensure that it does not contain blank pages. |
||||
|
Some parts, such as the controller or the board, may be defective. |
Contact a service representative. |
||||
|
The machine does not print PDF file correctly. Some graphics, text, or illustrations are missing. |
Incompatibility between the PDF file and the Acrobat products. |
Printing the PDF file as an image may enable the file to print. Turn on from the Acrobat printing options.
|
|||
|
The print quality of photos is not good. Images are not clear. |
The resolution of the photo is very low. |
Reduce the photo size. If you increase the photo size in the software application, the resolution will be reduced. |
|||
|
Before printing, the machine emits vapor near the output tray. |
Using damp paper can cause vapor during printing. |
This is not a problem. Just keep printing. |
|||
|
The machine does not print special- sized paper, such as billing paper. |
The Paper size and paper size setting do not match. |
Set the correct paper size in the in the tab in the (See Opening printing preferences). |
|||
|
The printed billing paper is curled. |
The paper type setting does not match. |
Change the printer option and try again. Go to , click tab, and set type to (See Opening printing preferences). |
|||
|
The printed paper is curled. |
Paper curl occurs dut to many different factors such as temperature humidity, paper type, high coverage printing, etc. |
Use the option. Go to (See Opening printing preferences), click tab, and click the check box. This option will optimize environmental factors to reduce the paper curl level. |
|||
If the inside of the machine is dirty or paper has been loaded improperly, you may notice a reduction in print quality. See the table below to clear the problem.
|
Condition |
Suggested solutions |
|---|---|
|
Light or faded print 
|
|
|
The top half of the paper is printed lighter than the rest of the paper 
|
The toner might not adhere properly to this type of paper.
|
|
Toner specks 
|
|
|
Dropouts 
|
If faded areas, generally rounded, occur randomly on the page.
|
|
White Spots 
|
White spots appear on the page.
|
|
Vertical lines 
|
If black vertical streaks appear on the page:
If white vertical streaks appear on the page:
|
|
Color or Black background 
|
If the amount of background shading becomes unacceptable:
|
|
Toner smear 
|
|
|
Vertical repetitive defects 
|
If marks repeatedly appear on the printed side of the page at even intervals:
|
|
Background scatter 
|
Background scatter results from bits of toner randomly distributed on the printed page.
|
|
Toner particles are around bold characters or pictures 
|
The toner might not adhere properly to this type of paper.
|
|
Misformed characters 
|
|
|
Page skew 
|
|
|
Curl or wave 
|
|
|
Wrinkles or creases 
|
|
|
Back of printouts are dirty 
|
|
|
Solid Color or Black pages 
|
|
|
Loose toner 
|
|
|
Character Voids 
|
Character voids are white areas within parts of characters that should be solid black:
|
|
Horizontal stripes 
|
If horizontally aligned black streaks or smears appear:
|
|
Curl 
|
If the printed paper is curled or paper does not feed into the machine:
|
|
An unknown image repetitively appears on a next few sheets or loose toner, light print, or contamination occurs. |
Your machine is probably being used at an altitude of 1,000 m (3,281 ft.) or above. The high altitude may affect the print quality such as loose toner or light imaging. You can set this option through (See Altitude adjustment). |
|
Condition |
Suggested solutions |
|---|---|
|
“File in Use” message appears during installation. |
Exit all software applications. Remove all software from the startup group, then restart Windows. Reinstall the printer driver. |
|
“General Protection Fault”, “Exception OE”, “Spool 32”, or “Illegal Operation” messages appear. |
Close all other applications, reboot Windows and try printing again. |
|
“Fail To Print”, “A printer timeout error occurred” messages appear. |
These messages may appear during printing. Just keep waiting until the machine finishes printing. If the message appears in ready mode or after printing has been completed, check the connection and/or whether an error has occurred. |
|
|
|
|
Refer to the Microsoft Windows User’s Guide that came with your computer for further information on Windows error messages. |
|
condition |
Suggested solutions |
|---|---|
|
The machine does not print. |
|
|
Some color images come out all black. |
This is a known bug in Ghostscript (until GNU Ghostscript version 7.05) when the base color space of the document is indexed color space and it is converted through CIE color space. Because Postscript uses CIE color space for Color Matching System, you should upgrade Ghostscript on your system to at least GNU Ghostscript version 7.06 or later. You can find recent Ghostscript versions at www.ghostscript.com. |
|
Some color images come out in unexpected color. |
This is a known bug in Ghostscript (until GNU Ghostscript version 7.xx) when the base color space of the document is indexed RGB color space and it is converted through CIE color space. Because Postscript uses CIE color space for Color Matching System, you should upgrade Ghostscript on your system to at least GNU Ghostscript version 8.xx or later. You can find recent Ghostscript versions at www.ghostscript.com. |
|
The machine does not print whole pages, and output is printed on half the page. |
It is a known problem that occurs when a color machine is used on version 8.51 or earlier of Ghostscript, 64-bit Linux OS, and has been reported to bugs.ghostscript.com as Ghostscript Bug 688252. The problem is solved in AFPL Ghostscript v. 8.52 or above. Download the latest version of AFPL Ghostscript from http://sourceforge.net/projects/ghostscript/ and install it to solve this problem. |
|
I encounter the “Cannot open port device file” error when printing a document. |
Avoid changing print job parameters (via LPR GUI, for example) while a print job is in progress. Known versions of CUPS server break the print job whenever print options are changed and then try to restart the job from the beginning. Since Unified Linux Driver locks the mfp port while printing, the abrupt termination of the driver keeps the port locked and unavailable for subsequent print jobs. If this situation occurs, try to release the mfp port by selecting in window. |
|
|
|
|
Refer to the Linux User’s Guide that came with your computer for further information on Linux error messages. |
|
condition |
Suggested solutions |
|||
|---|---|---|---|---|
|
The machine does not print PDF files correctly. Some parts of graphics, text, or illustrations are missing. |
Printing the PDF file as an image may enable the file to print. Turn on from the Acrobat printing options.
|
|||
|
The document has printed, but the print job has not disappeared from the spooler in Mac OS X 10.3.2. |
Update your Mac OS to OS Mac OS X 10.3.3. or higher. |
|||
|
Some letters are not displayed normally during the Cover page printing. |
Mac OS cannot create the font during the Cover page printing. The English alphabet and numbers are displayed normally on the Cover page. |
|||
|
When printing a document in Macintosh with Acrobat Reader 6.0 or higher, colors print incorrectly. |
Make sure that the resolution setting in your machine driver matches the one in Acrobat Reader. |
|
|
|
|
Refer to the Macintosh User’s Guide that came with your computer for further information on Macintosh error messages. |